In Part 1 of our Misinformation and Disinformation blog series, we talked about intent being the key differentiator between misinformation and disinformation, reasons why we not only allow but fuel the spread of “fake news”, and lastly, we gave some pointers to help you to verify whether a story is true or fake news.
We also mentioned how Maltego can be used by anyone to help investigate misinformation and disinformation. To show you how this can be done, this article will walk you through a series of steps that can be taken using Maltego to investigate a suspicious news article found on a social media post.
Misinformation & Disinformation: A Two-Part Maltego Blog Series 🔗︎
We have created a two-part blog series to raise awareness of misinformation and disinformation, and how one can conduct simple but insightful disinformation investigations with Maltego.
Investigating Fake News with Maltego Transforms 🔗︎
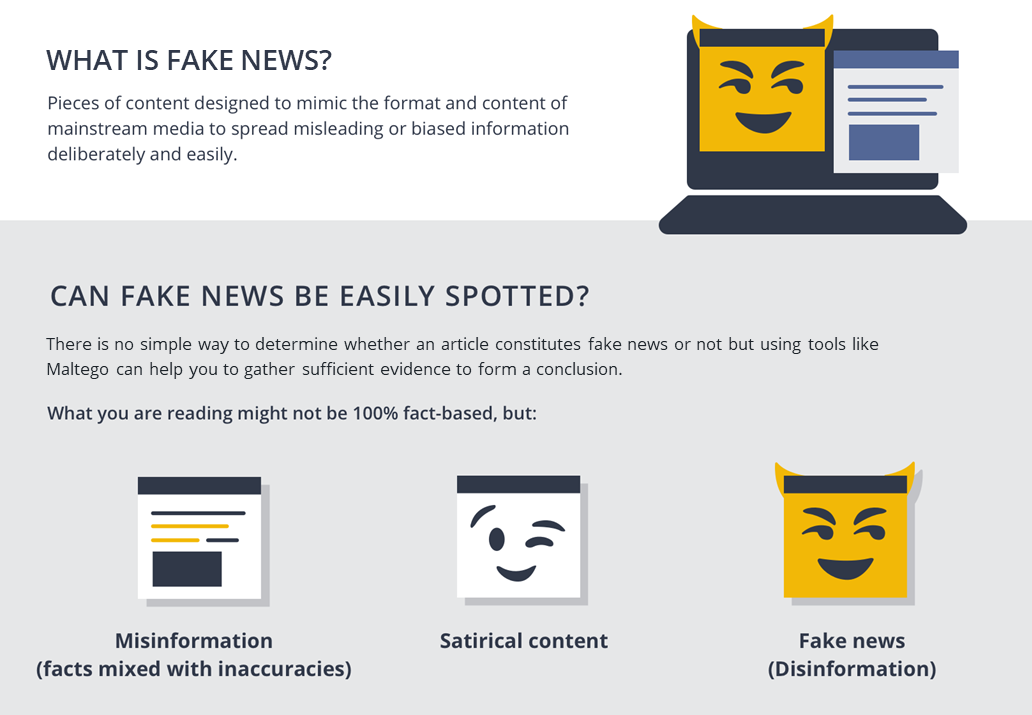
Fake news is not always easy to spot, much less differentiate from inaccuracies in reporting, opinion pieces, and even satirical content, which further facilitates the spread of misinformation and disinformation. The good news is that digital artifacts (IP addresses, URLs, webpages, domains, and many more) are a product of said spread, and they constitute networks of evidence that can be traced and studied.
Where Maltego Comes In 🔗︎
By allowing investigators to access OSINT and third-party data, Maltego can help map misinformation and disinformation networks and study the relationships between the different artifacts that constitute them, understand how a particular piece of fake news spreads, and potentially determine who is behind a specific campaign.
Maltego Investigation on A Suspicious News Article Found on Social Media 🔗︎
While scrolling through your social media feed, you may find posts that link to seemingly suspicious news articles. Let’s say we find such a post with a heading that looks suspicious or outlandish, we click on it and after reading the article we still have doubts about the information it presents or the reliability of the website hosting it. Time to fire up Maltego!

Step 1: Perform A Phrase Search to Cast A Wide Net 🔗︎
Let’s start with a “catch all” type of query which will help us gain a general perspective of how widespread the allegations in the article are across the internet. All you need to do is drag a phrase Entity into the Maltego graph and name it with a phrase or term containing the core allegation of the article.
Now run the To Website [using Search Engine] Transform from the Phrase Entity to return websites containing the phrase you are looking for. You may use more than one Phrase Entity if, for example, you wish to search for the story across different languages.
Step 2: Extract the Website Hosting the Article 🔗︎
You will now copy the article’s URL from the search engine and paste it onto the Maltego graph. Worry not, Maltego will recognize it as a URL and adopt the corresponding Entity. You can also bookmark the Entity to help keep track of this entry point as your investigation progresses and your graph expands.
From the URL Entity, run the To Website [Convert] Transform to obtain the website hosting the article you read. The resulting Entity may form a link between it and the websites you obtained in Step 1.
We will now select the websites obtained through Step 1 and run the To URLs [show Search Engine results] Transform which will return all the web pages (URL Entities) that resulted from the query performed with the Transform used In Step 1.
An optimal result for our investigation would be a link forming between the URL we pasted at the beginning of this step and one of the resulting ones from the Transform we just ran, but this is not always the case. Given that the results of the last Transform would be those you obtain on the search engine, you may also at this point review the URLs and remove those that may not be relevant to the investigation.
Step 3: Perform Network Reconnaissance 🔗︎
We will pull some infrastructure data from our target URL to analyze its network environment. Depending on our results, we may be able to establish stronger links to other websites that either portray similar ideologies or might have themselves been victims of misinformation or a disinformation campaign.
First, we will select the Website Entity we obtained In step 2 and run the To IP Address [DNS] Transform to extract the IP address(es) resolving from the target website. Once we have retrieved the IP Address Entity(ies), we will select them and run the To Website using IP [Bing] Transform to find other websites that have been hosted on the same IP(s).
Again, at this point, the resulting website Entities may form links with those you already have on the graph, thus forming the network behind the spread of this article.
Step 4: Extract Tracking Codes and Other Technologies 🔗︎
Go back once more to the website Entity you obtained in Step 2, select it, and run the To Relationships [BuiltWith] Transform to find tracking codes from services such as Facebook Pixel, Google Analytics, Google Tag Manager, among other internet technologies. The returned Entity(ies) will be queried later on as we explore the article’s network and infrastructure.
Step 5: Extract the Links and Images behind the Article 🔗︎
We will now query for data related to our target URL. This will help us continue mapping out the network behind the article and uncover hidden relationships.
Firstly, we will look for URLs linked to the article, and therefore the website hosting it, by running the To Links [Found on web page] Transform on the URL Entity we pasted into the graph in Step 2. This Transform will scrape the HTML source code of the target webpage and return all external links found.
Considering the Transform might return hundreds of URLs, an efficient way to visualize the type of websites we are dealing with is to run the To Website [Convert] Transform on the resulting URLs. This way, the resulting Entities will automatically group the URLs by Website when possible.
Since the resulting URL and website Entities may help us further construct the network behind the story by presenting us with more links between them and those already on the graph, it is always important to carry out a manual analysis in order to discard any non-relevant results to our investigation.
Secondly, we will attempt to extract the external links found on the Website Entity we obtained in Step 2 by running the Mirror: External links found Transform on it. Remember that:
- The links will be returned as Website Entities, and
- Not all sites are mirror friendly. For example, Flash-based sites and those with exotic JavaScript menus and redirects.
Lastly, we will go back to our initial URL and run the To Images [Found on web page] Transform on it. This Transform will scrape the web page for the images found in it, including those that illustrate the article itself and those that are part of suggested article links, advertisements, etc. Depending on the images extracted, the results may allow us to analyze whether other websites where the images are featured portray the same or related stories.
Step 6. Spider Out & Analyze the Article’s Network and Infrastructure 🔗︎
We will now return to the tracking codes we obtained in Step 4 by selecting the Entities that resulted from the To Relationships [BuiltWith] Transform and running the To Matches [show BuiltWith results] Transform.
Given that a tracking code is assigned to a specific customer, obtaining other websites may indicate that they belong to the same individual or organization, or that the account behind the tracking codes has been compromised and is being used for different websites without authorization.
To continue, we will look at the thumbnails from the images we obtained in Step 5 and select the ones that may be useful, which would usually be somewhat unique images (outlandish, possibly manipulated, memes, etc.).
Once you have found images you consider useful, run the Search for pages linking to similar images [TinEye] Transform. The resulting backlinks will allow us to further understand the network behind the article. In case we obtained many results, it is always recommended to run the To Website [Convert] Transform to see how the URLs group.
It is time to spider out the network! At this point, you may re-run the To Links [Found on web page] Transform on the URL Entities obtained in Step 5 several times, but remember to analyze the URLs returned before each new run in a similar way as the one portrayed here. You may also take the relevant URLs you obtained on step 2 and query them the same way you did the target URL.
Investigating Disinformation Campaigns: What to Watch Out For 🔗︎
Networks behind webpages can quickly become densely populated, which is why it is always important to review the results obtained after running Transforms and discard any Entities that may not be relevant to the overall investigation. For example, after extracting images or links from a web page, you may wind up with data from paid advertisements completely unrelated to your investigation.
It is also important to pay attention to any links pointing out forums or social media targeting fringe political and ideological views and theories since they might give away the intent behind the website sharing the article as well as the reader segment it is targeting.
Similarly, if our target article is one in which a specific product, brand, or organization is being questioned or attacked, it is then important to keep an eye out for links that might point to specific groups or competitors which might indicate a potential smearing campaign designed to affect the opponent’s reputation or financial standing.
Similar websites linked by IP addresses or tracking codes will help you build out the network behind your target web page, they will also help you understand how if the content’s spread across geographies or demographics was fueled by more than algorithms.
How to Further Extend Your Investigation 🔗︎
Remember that the Transforms represented on the flow chart are only a selection of our freely available data sources. There are many more that can be used to pivot and dive deeper into disinformation networks.
For example, using Transforms from data partners with identification capabilities and social media data such as Pipl, ShadowDragon, or Social Links will help you trace the spread of a story across groups and forums, and pinpoint to influential users that may be acting as gate keepers or information.
Download this infographic and the investigative flowchart to share with your teams and colleagues!
Don’t forget to follow us on Twitter and LinkedIn or subscribe to our email newsletter to stay tuned for more use cases, product and Transform updates.
Happy investigating!